
먼저 numpy를 사용할 것이기 때문에 설치를 한다.
1
2
3
4
5
6
7
8
9
10
11
12
13
14
15
16
$ pipenv install numpy
Courtesy Notice: Pipenv found itself running within a virtual environment, so it will automatically use that environment, instead of creating its own for any project. Y
ou can set PIPENV_IGNORE_VIRTUALENVS=1 to force pipenv to ignore that environment and create its own instead. You can set PIPENV_VERBOSITY=-1 to suppress this warning.
Installing numpy...
Adding numpy to Pipfile's [packages]...
Installation Succeeded
Pipfile.lock (3da5fd) out of date, updating to (e908c9)...
Locking [packages] dependencies...
           Building requirements...
Resolving dependencies...
Success!
Locking [dev-packages] dependencies...
Updated Pipfile.lock (73107c9198032a73a66a3e3f5a4803a58b72c481e7b969c88d42d87544e908c9)!
Installing dependencies from Pipfile.lock (e908c9)...
To activate this project's virtualenv, run pipenv shell.
Alternatively, run a command inside the virtualenv with pipenv run.
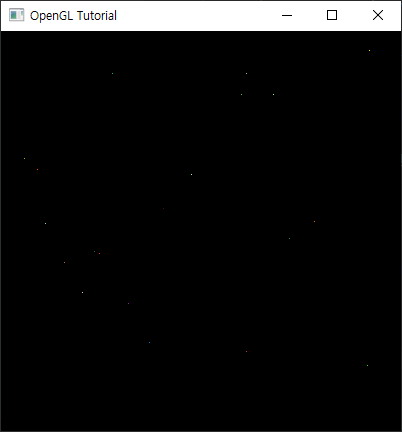
점 그리기
OpenGL에서는 기본적으로 정점의 좌표값을 [-1, 1] 범위로 정규화(normalize)하여 처리합니다. 따라서 생성한 랜덤한 정점의 좌표값이 [-1, 1] 범위 안에 있도록 합니다.
1
2
3
4
# -1에서 1사이의 랜덤한 정점 좌표 생성
vertices = np.random.uniform(-1.0, 1.0, (20, 3)).astype(np.float32)
# 0에서 1사이의 랜덤한 색상 생성
colors = np.random.uniform(0.0, 1.0, (20, 3)).astype(np.float32)
다음으로 shader를 작성합니다. shader는 정점 데이터의 위치, 색상 등의 정보를 가지고 최종적으로 그려질 픽셀의 색상 값을 계산하는 역할을 합니다.
1
2
3
4
5
6
7
8
9
10
11
12
13
14
15
16
17
18
19
20
21
22
23
24
25
26
27
28
import OpenGL.GL.shaders as shaders

vertex_shader_source = """
#version 330
in vec3 position;
in vec3 color;

out vec3 newColor;
void main()
{
    gl_Position = vec4(position, 1.0);
    newColor = color;
}
"""

fragment_shader_source = """
#version 330
in vec3 newColor;

void main()
{
    gl_FragColor = vec4(newColor, 1.0);
}
"""

vertex_shader = shaders.compileShader(vertex_shader_source, GL_VERTEX_SHADER)
fragment_shader = shaders.compileShader(fragment_shader_source, GL_FRAGMENT_SHADER)
shader = shaders.compileProgram(vertex_shader, fragment_shader)
마지막으로 VBO에 담아 정점 데이터를 GPU에 업로드합니다.
1
2
3
4
5
6
7
8
9
10
11
12
13
14
15
16
17
18
19
20
21
22
23
# enable vertex attributes
position_location = glGetAttribLocation(shader, "position")
glVertexAttribPointer(position_location, 3, GL_FLOAT, GL_FALSE, 0, vertices)
glEnableVertexAttribArray(position_location)

color_location = glGetAttribLocation(shader, "color")
glVertexAttribPointer(color_location, 3, GL_FLOAT, GL_FALSE, 0, colors)
glEnableVertexAttribArray(color_location)

# 렌더링 루프
while not glfw.window_should_close(window):
    # 화면 지우기
    glClear(GL_COLOR_BUFFER_BIT)

    glUseProgram(shader)
    glDrawArrays(GL_POINTS, 0, len(vertices))

    # 버퍼 스왑 및 이벤트 처리
    glfw.swap_buffers(window)
    glfw.poll_events()

# 자원 해제
glfw.terminate()
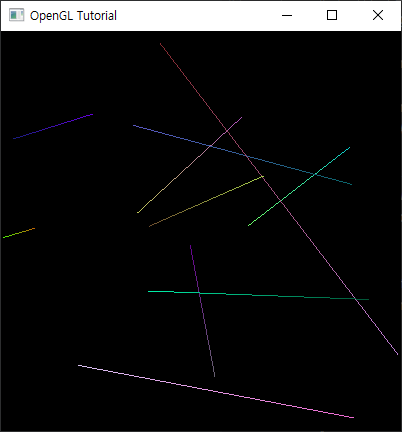
선 그리기
1
glDrawArrays(GL_LINES, 0, len(vertices))
면 그리기
1
glDrawArrays(GL_POLYGON, 0, len(vertices))

전체 코드는 [깃허브] 를 확인하면 된다.
Reference
• https://kyoungwhankim.github.io/ko/blog/opengl_triangle1/
• http://www.dgp.toronto.edu/~ah/csc418/fall_2001/tut/ogl_draw.html